
Misc. Air problems <mrw>
Solenoids: The heart of air handling
OmniTurn has used two different types of air solenoids for air handling.
Both types of solenoid units operate in an identical manner and are powered by 12VDC
| Festo Solenoids | Mac Solenoids |
 |
 |
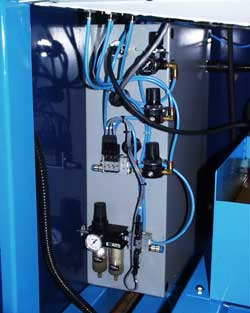
The Festo solenoid is distinquished by its small size, silver colored body and black ends. The vast majority of these solenoids use a quick disconnnect plug-in cable, which is held in, with a intergal clip on the back of the cable end. This clip must be depressed before attempting to remove the cable or else the solenoid will be damaged. These same solenoids have an LED inside the smoked gray connector housing, that is illuminated when the solenoid is powered. A notable feature that many are not aware of, is a manual override button located just below the connector housing. This is a small white stud, that, when pressed, will actuate the air output. This also has the advantage of purging any debris or water that may have lodged in the solenoid.
There are two types of Festo Solenoids: the single and the double. The single has an electrical connection on one end only, and is only an "on/off" device. The double has an electrical connection at both ends, and is a "shuttle" type. IE, energized it allows air to flow from one side, and de-energized the air flows from the other.
The MAC solenoid is a complete unit that combines the solenoid with the manifold. Each unit may be ganged with others.
The MAC unit uses screw terminals rather than a quick disconnect system. The MAC unit does have a manual override and LED like the Festo units.
Diagnosing Solenoid Problems
Tools needed:
(1) small jewelers sized Phillips screw driver
(1) Volt Ohm meter
Be sure there is air supplied to the OmniTurn!
If an air operated device stops working, the first thing to do, is to identify the solenoid. Trace the air line from the air device, back down to its solenoid
Enter the appropriate M code, or press the appropriate button. Check the solenoid for a red LED that illuminates as you enter the command or press the button.
Press the manual override button on the solenoid, and see if the device actuates. If the device operates, remove the cable and use your volt meter to check for proper voltage. If 10-12VDC is measured, replace the defective solenoid and retest. If no voltage is measured, call OmniTurn for service.
Individual device diagnosis
Parts Catcher:
The parts catcher uses a double solenoid. One side is used to pull and the other is to push. The actuator is a double acting air cylinder.
If the parts catcher seems stuck in one direction, press the manual override button on the controlling solenoid.
If the cylinder works properly, and the red lights both work correctly, and the cylinder still doesn't move, replace the solenoid.
If one light doesn't work, and there is proper voltage on that cable, replace the defective solenoid.
To slow down or speed up the travel of the cylinder, there is a small valve on each end that may be adjusted with a flat-bladed screwdriver. Be careful. There may be a point as the basket fills up that the operation of the parts catcher may become unreliable.
Collet closer:
Dunham, Royal and Microcentric collet closers use a double solenoid. Remove the air lines at the collet closer. One line should be constantly blowing. Press the open/close buttons, and the air should shuttle from one line to the other. If it doesn't, press the manual override button on the solenoid. If this shuttles the air, check for proper red LED operation. If one LED doesn't illuminate, check voltage on that cable. If proper voltage is there, replace the defective solenoid. If voltage is not there, contact OmniTurn for service. If pressing the override does not shuttle the air, replace the defective solenoid.
Push-pull solenoids use two single solenoids. Remove the air lines from the collet closer, and press the open/close buttons. Air should alternate between lines. If the air does not blow, locate the solenoids and press the manual override buttons on the two solenoids. If this blows air from each line, check for LED operation. If the LED works, but no air blows, replace the defective solenoid. If no LED, check for voltage at the cable. If voltage present, replace the defective LED, If no voltage, call OmniTurn for service.
Collet Closer Spindle Override:
Some OmniTurn machines have as an option, an air pressure override switch that locks out the spindle unless the collet is closed. This device may be located in line with the collet "close" air line. Typically this is a normally open pressure switch, that closes and allows the spindle to run only if there is pressure on the Close side of the collet closer.
Check for air pressure at the pressure switch. If no air pressure, follow solenoid diagnostics outlined above.
If there is air pressure, replace the pressure switch. The switch may be bypassed if absolutely necessary, by tracing the two wires from the switch, and jumpering across them in the drive control panel. This will allow the spindle to turn if the collet is open! Use at your own risk, and advise your operators that this feature has been bypassed. OmniTurn has no responsibility for damage or injuries if you bypass this optional feature.
Collet Closer Lubricator:
The collet closer lubricator should be set to produce a single drop approximately every 45 seconds. If the lubricator will not drip, remove the air line supplying the lubricator. Enter M03S0 in MDI mode. This will activate the lubricator air solenoid, but not turn the spindle. If air does not blow from the supply line, check the regulator for output. There should be approximately 16PSI output. Remove the regulator input line and check for air. If no air, check the solenoid as shown above. If there is air supplied to the regulator, but none passing through, replace the regulator.
If air supply is present at the lubricator, hook up the supply line, and remove the one or two lines that supply the lubricated air to the collet closer, and see if there is pressure on each line. If there is no air present, remove the supply line, and using an air source, back flush the lubricator by pressuring the small lube lines. Bubbles should be present in the bowl. Recheck hook, then supply air and recheck. If air flow is not present now, in the lube lines, replace the lubricator. If air pressure is present, adjust the drip flow. Connect the lube lines to the collet closer, and recheck drip flow. If there is no drip, increase the collet closer regulator pressure a few pounds. If there is still no drip flow, contact OmniTurn for service.
Spindle Purge:
The spindle purge air line located at the front of the spindle cartridge on the OmniTurn Gt-75 maintains a positive air pressure in the spindle cartridge, preventing water based coolants from entering and rusting, or washing the bearing grease out.
This should be checked periodically. Remove the air line from the fitting at the cartridge, and enter M03S0 from MDI. Air should blow at approx. 6lbs. If no air flows, check the solenoid as outlined above.
Air Tools/Air Blast:
Air tools may be operated directly from a solenoid, or via a solenoid operated air switch.
Enter the proper M code from MDI and check for air flow on the air tool supply line. Trace the airline back down to the solenoid, and check the solenoid as outlined above. If there is an Air Switch driving the air tool, locate the solenoid driving the control side of the AS, and check for pressure. If pressure is present, check the main air supply to the AS. Remove the input line and check for house pressure. If house pressure is present, and the control air works correctly, replace the Air Switch.
Slide Brake:
The later OmniTurn GT-75 models use a air actuated slide brake to prevent the X axis from sliding down when the machine is turned off. This brake consists of a spring loaded air cylinder mounted on the back of the X axis slide. When the machine is powered down, or the servo power is turned off, the spring in the air cylinder pushes a piston through a hole in the back of the X axis slide and against the back of the servo coupler.
The slide brake will retract the moment servo power is turned on. If it fails to do so, remove the air line from the slide brake cylinder, and press the E Stop button on the control. Air should flow start. If it does not, trace the airline back to the solenoid, and diagnose as stated above.
If air pressure is present, remove the slide brake cylinder from the slide, reconnect the air line and test. If the plunger does not retract or extend, replace the slide brake. If the plunger extends with very small force, replace the brake. Before reinstalling the slide brake, clean the mating surfaces and the area behind the servo coupler. Often , chips will build up in this area, and can jam the plunger.
The slide brake may allow the slide to move or fall if:
You use a very slippery coolant, and the tool plate is loaded with heavy tools
The slide brake plunger spring is worn or collapsed. Replace slide brake
The tip of the plunger is worn. This can be replaced.
Contact OmniTurn Service for service or parts.
|
|
 |
|||||||||||||||||